Setup · June 2026
Windows Dev Setup, the Short Way
Every “set up your machine for coding” guide is a wall of installs — Node, a package manager, Git, the GitHub CLI, the PATH surgery when half of them aren't found. On Windows it's even fiddlier than on a Mac.
Here's the shortcut: you only have to install two things by hand — the right terminal and the Claude Code CLI. Once Claude is running, you hand it a prompt and it installs the rest of the toolchain for you, running the commands itself.
June 2026 · Alex Miller
Three Rules That Prevent 90% of the Pain
Use the right terminal
Windows PowerShell or Windows Terminal — the 64-bit one, not the “x86” build, and never Git Bash (Claude Code throws Raw mode is not supported there).
Restart the terminal after every install
New tools land on your PATH, but an open window can't see them until you close it and open a fresh one. This is the #1 reason “it installed but the command isn't found.”
One thing at a time
Run a step, confirm it worked, then move on. It's faster than untangling three half-finished installs.
Step 1 — Open the Right Terminal
Press Start, type PowerShell, and open Windows PowerShell (the plain blue one — not “x86,” not “ISE”). If you have Windows Terminal, that's even better.
You're in the right place when the prompt looks like PS C:\Users\YourName>. The PS at the front is what confirms it's PowerShell.
Step 2 — Install Claude Code
The native installer is a single line, and it needs no Node.js — it downloads a self-contained binary and adds it to your PATH.
irm https://claude.ai/install.ps1 | iexOn Command Prompt instead of PowerShell, use this one:
curl -fsSL https://claude.ai/install.cmd -o install.cmd && install.cmd && del install.cmdNow close the terminal and open a new one (rule #2), then just launch it:
claudeThe first time you run claude, your browser opens to sign in — you need a Claude Pro or Max plan, or an API key (Claude Code isn't on the free plan). Once you're signed in, Claude Code starts up and you're in. That's the hard part done.
“claude is not recognized”? The PATH didn't refresh. First just close and reopen the terminal. If it's still missing, the installer put claude.exe in %USERPROFILE%\.local\bin but didn't add it to PATH — add it using the environment-variable section below, then restart the terminal.
Now Hand the Rest to Claude
This is the part the old guides miss. You just installed an agent that can run terminal commands — so stop running them yourself. Launch Claude in an empty folder and paste it the shopping list:
I'm on native Windows in PowerShell. Install the rest of my dev
toolchain for me with winget, using these exact packages:

  1. Node.js LTS — winget id OpenJS.NodeJS.LTS
  2. pnpm — winget id pnpm.pnpm
  3. Git for Windows — winget id Git.Git
  4. The GitHub CLI — winget id GitHub.cli

After any install that changes my PATH, stop and tell me to close
and reopen the terminal — you won't see the new command until I do.
When everything's in, verify each tool prints a version number.
Claude runs the winget installs and walks the list. You become the hands for the one thing it can't do itself: restart the terminal.
That limit is worth understanding. When an install changes your PATH, the running shell — Claude's included — can't see the new command until the terminal is reopened. So the rhythm is: Claude installs → it tells you to reopen the terminal → you relaunch claude and say “continue.” A couple of restarts and the whole toolchain is in.
What Claude installs for you
- Node.js (LTS) — the plain installer, so
nodeworks in every terminal without any extra setup. - pnpm, installed standalone via winget — your house package manager.
- Git for Windows — the thing every guide assumes you already have.
- GitHub CLI (
gh), thengh auth loginonce so clone and push over HTTPS stop asking for a password.
If You'd Rather Do It by Hand
Maybe you like knowing exactly what ran, or Claude hit something machine-specific. Here's the same toolchain, command by command. Reopen the terminal wherever a comment says to.
# Node.js LTS — plain install, works in any terminal afterward
winget install -e --id OpenJS.NodeJS.LTS

# pnpm — standalone, no Corepack needed
winget install -e --id pnpm.pnpm

# Git for Windows + the GitHub CLI
winget install -e --id Git.Git
winget install -e --id GitHub.cli

# …reopen the terminal after each install, then sign in to GitHub:
gh auth login
gh auth setup-git
One snag worth knowing: winget is not recognized means you need App Installer from the Microsoft Store, which is what provides winget. Install it, reopen the terminal, and the winget lines will work.
A note on Node version managers
The plain Node install above is the right call when you're starting out — node just works, everywhere. Later, when you have projects pinned to different Node versions, reach for fnm. The one thing people miss: you must set a default, or a fresh terminal won't find node at all.
# Install fnm, then load it in every new PowerShell window
winget install -e --id Schniz.fnm
Add-Content $PROFILE 'fnm env --use-on-cd | Out-String | Invoke-Expression'
# …reopen the terminal, then install a Node and SET IT AS DEFAULT
# (without 'fnm default', a fresh terminal won't find node):
fnm install --lts
fnm default lts-latest
If the Add-Content line errors, your profile script is blocked — run Set-ExecutionPolicy -ExecutionPolicy RemoteSigned -Scope CurrentUser once, then retry. (Skip all of this if you used the plain Node install — you don't need it.)
Adding an Environment Variable on Windows
You'll need this whenever a command “isn't recognized” after installing (you add a folder to Path), or when a tool wants a key like ANTHROPIC_API_KEY. To open the editor, press Win + R, type sysdm.cpl, press Enter, then go to Advanced → Environment Variables.
The part that trips people up is what happens after you click Edit — a second window opens that's a list, not a text box. Here's the whole flow:
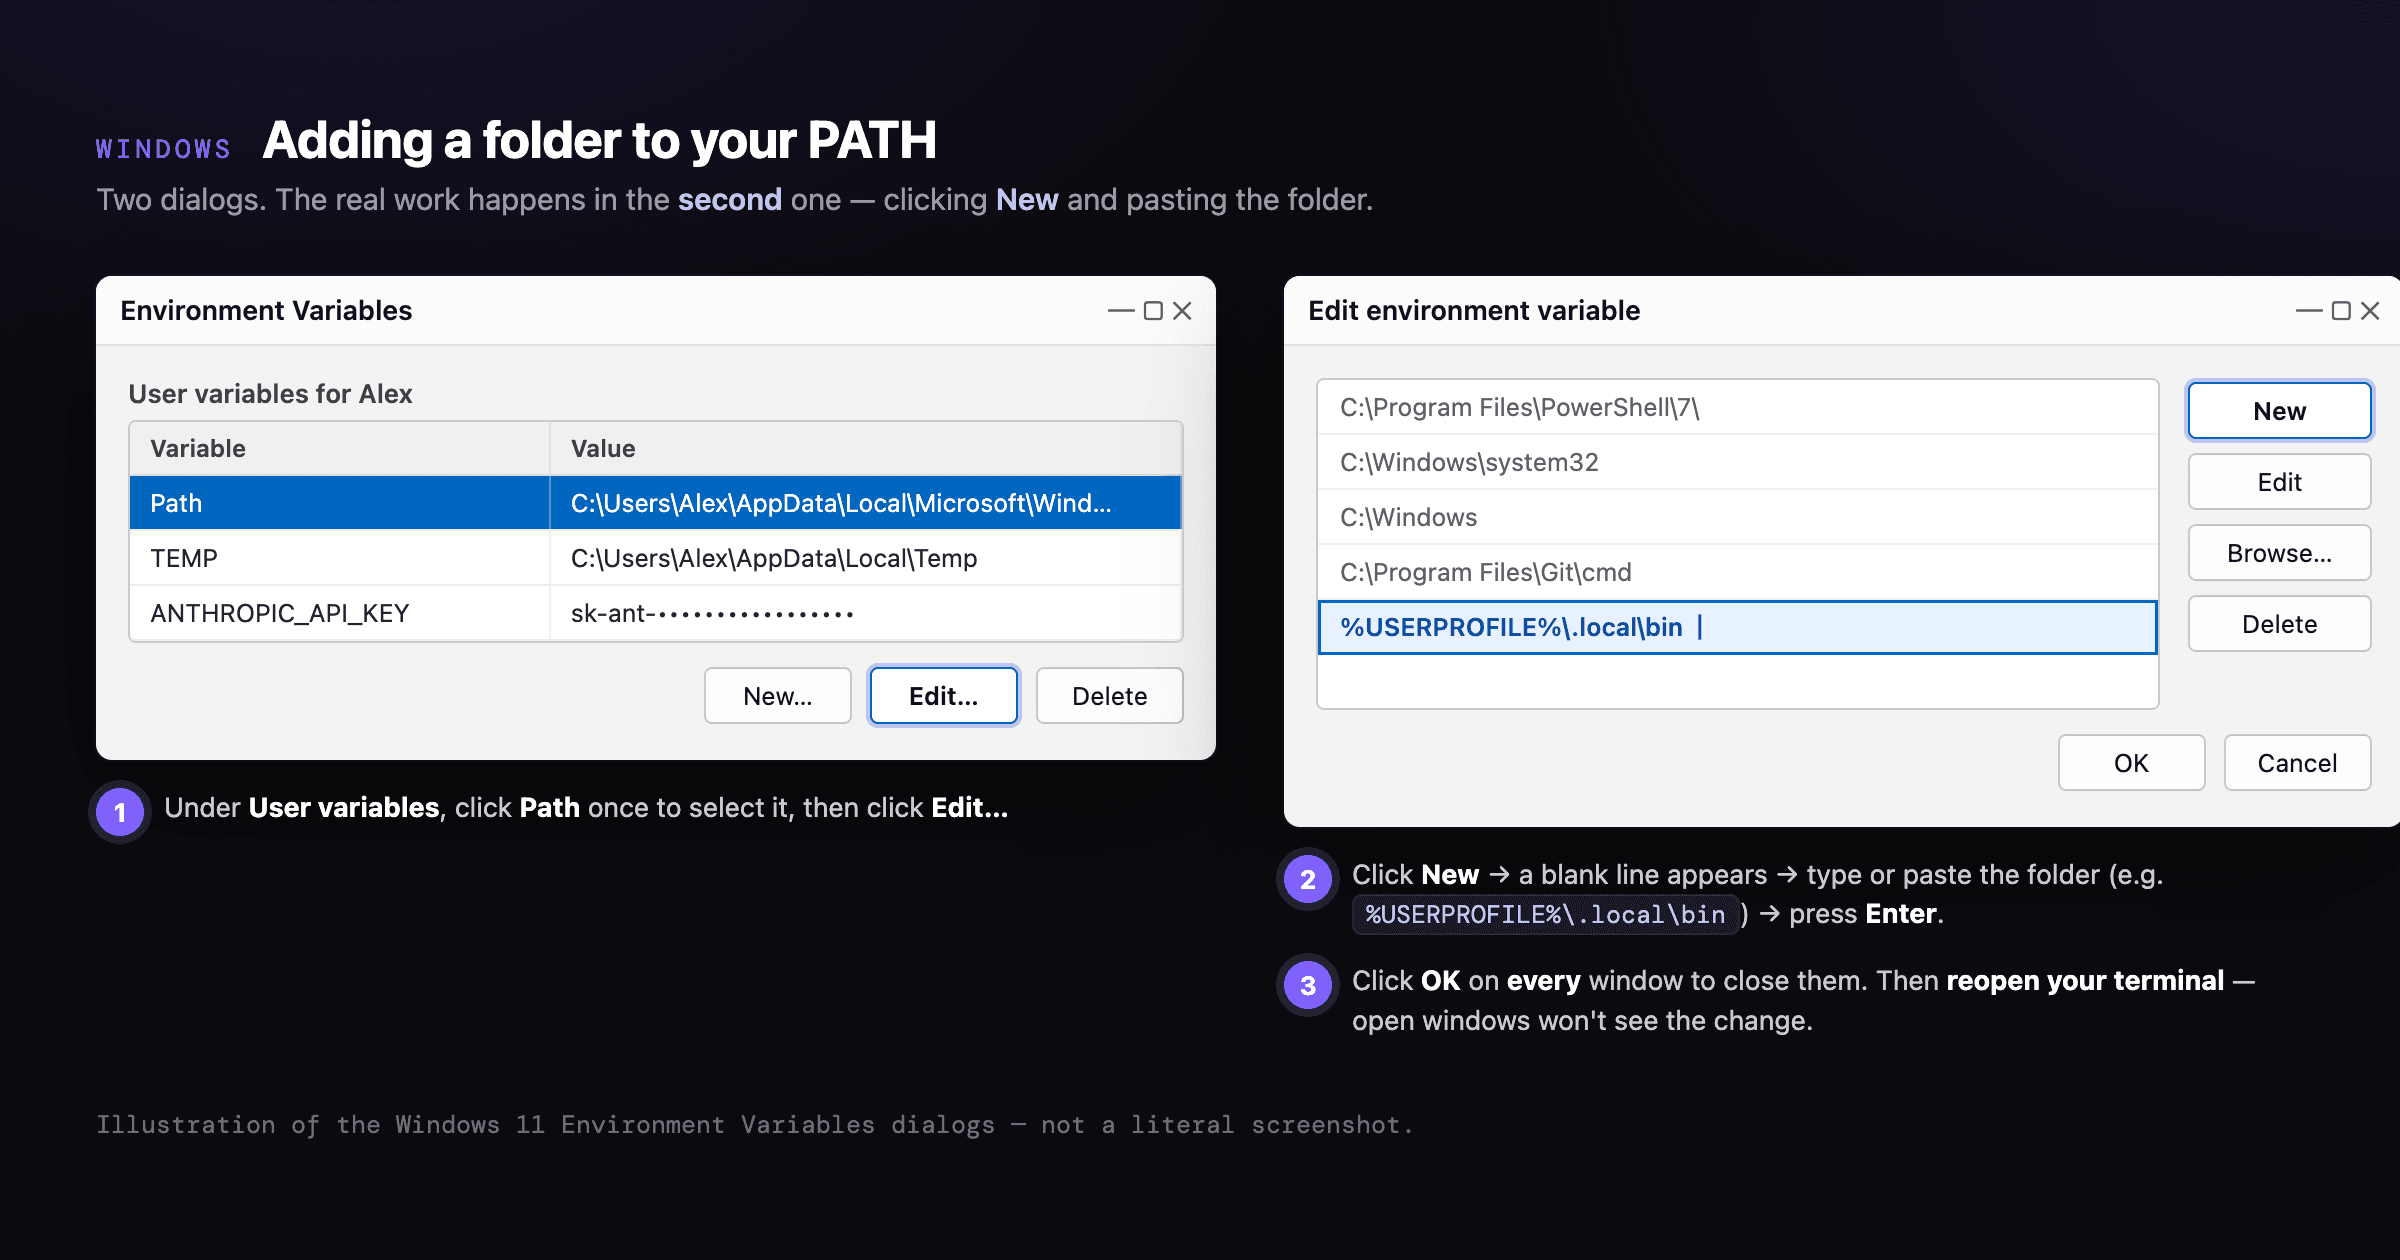
- Under User variables (the top box — that's the one that doesn't need admin rights), click
Pathonce to select it, then click Edit… - In the window that opens, click New. A blank line appears at the bottom of the list. Type or paste the folder — e.g.
%USERPROFILE%\.local\bin— and press Enter. You're adding one line; don't touch the others. - Click OK on every window to close them all. If you stop early, nothing saves.
Prefer one line over the clicking? This PowerShell command reads your existing PATH and appends to it, so it won't clobber what's there:
$old = [Environment]::GetEnvironmentVariable("Path","User")
[Environment]::SetEnvironmentVariable("Path", $old + ";$env:USERPROFILE\.local\bin", "User")
Either way, reopen the terminal afterward. The current window keeps showing the old value — that's expected; a fresh one picks up the change.
Final Sanity Check
Claude's already running from Step 2. To confirm the toolchain it installed, open one fresh terminal and run these five. Five version numbers and you're done.
node -v
npm -v
pnpm -v
git --version
gh --versionWant your whole team set up like this?
I run AI workshops on Claude Code — getting a room of people from a blank machine to shipping with AI-assisted development in an afternoon.
Book a 30-Minute Call